How to Use PineHook+
🎥 Video Tutorial
If you’d prefer a visual guide, I’ve created a short video that walks you through the process. Watch the video below for instructions:
Though it’s really sad to me that even though we did a lot of work on PineHook, made it so much easier that now it’s just a matter of few minutes (Within 5 minutes) still people are not able to use it.
So, Here I am, read this article and know just how easy it is to use.
Step 1: Setting Up+
To begin, You have two options either if you have good time and want to compile from source, then grab the source code from PineHook+ GitHub Repo and compile it yourself.

Or, if you are in a hurry, then you can download the precompiled apk or hook file (whatever you wish I’ve provided both) from the Releases section.
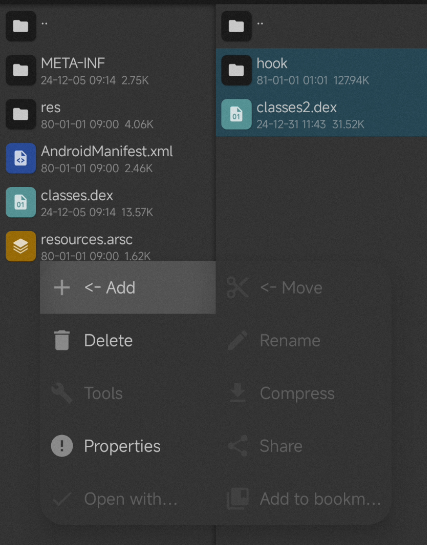
If you have downloaded the apk, then first you’ll have to extract the /hook folder & the smali classes from dex.
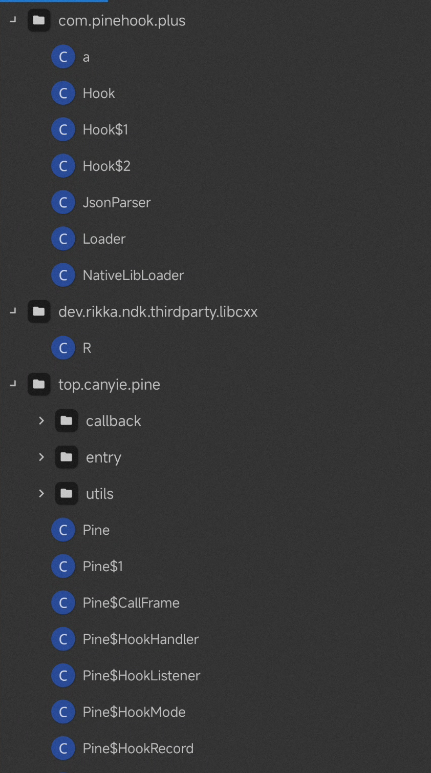
Classes which you have to extract are:
top.canyie.pinepackagecom.pinehook.plus.aclasscom.pinehook.plus.Hookclass & it’s subclasses (likecom.pinehook.plus.Hook$1,com.pinehook.plus.Hook$2, etc. if any)com.pinehook.plus.JsonParserclasscom.pinehook.plus.Loaderclasscom.pinehook.plus.NativeLibLoaderclassdev.rikka.ndk.thirdparty.libcxxpackage (if any)
Your extracted dex should look like this:
NOTE: Skip this step if you have downloaded the hook zip file. It already contains the extracted classes & files.
Step 2: Identify your target method
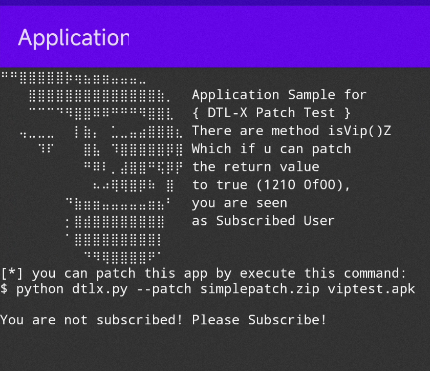
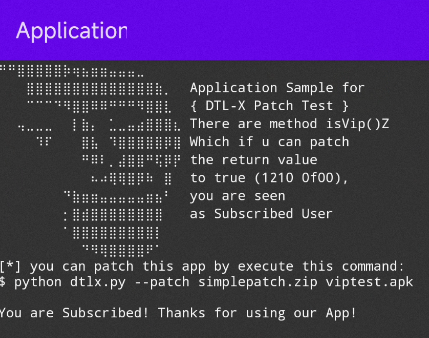
Now, get the class name and method name of the method you want to hook from hyour target app. For example I’m taking this app as an example.
Now when you install the app, It’ll show us, You are not subscribed! Please Subscribe! message. So, I’ll hook the method which is responsible for it.
After decompiling the apk and observing the smali code, I found that the method responsible for this message is in MainActivity class onCreate method.
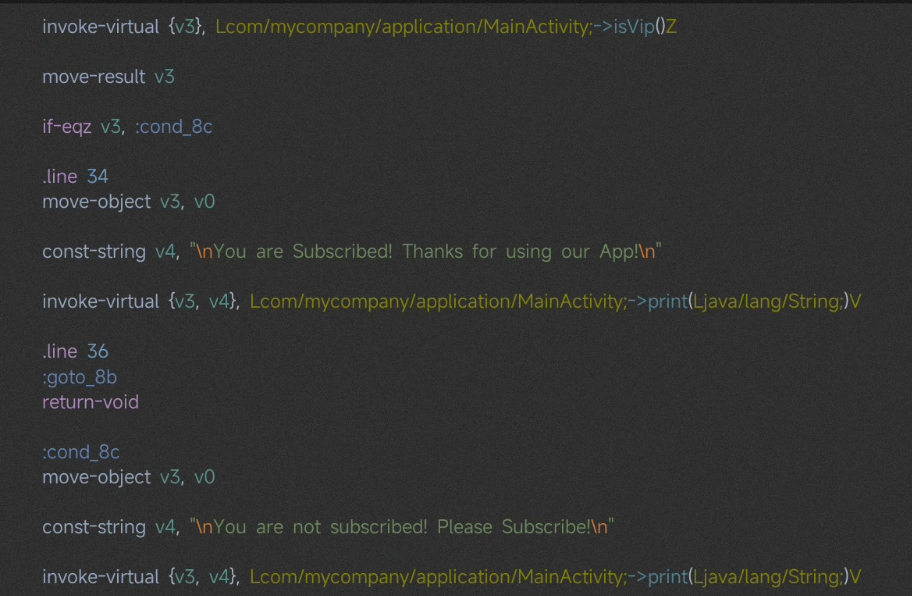
As you can see in the above image, it’s taking value from isVip boolean method and if it’s false i.e, 0 then it’s showing the Not Subscribed message else show the Subscribed message.
So we’ve to hook this method and change the value of isVip to 1 so that it’ll show the Subscribed message.
Step 3: Move Hook files to your target app
Now extracted dex & hook folder which we extracted in Step 1 to your target apk.
Step 4: Hook the method
FOr that don’t worry you don’t have to write any hook, go to the added hook folder, there you’ll find a config.json file, that’s where we need to modify the hook.
By default there’ll be alot of example hook in it. Just remove them all and take note of format structure of the file, Also described in README of the repo.
So, in my case:
isVip= my target method name.com.mycompany.application.MainActivity= my target class name where target method is.- from the above image, I can see that the method is taking no arguments (means it has no parameter types) and returning a boolean value.
So, in conclusion what my need is to modify the return value of this method which means the “after” key in the config so then my hook will finally becomes like this:
{
  "com.mycompany.application.MainActivity": {
    // Here goes the class name
    "isVip": {
      // Here goes the method name
      "after": {
        // I wanna modify the return value of this method
        "result": true // My new return value
      }
    }
  }
}
Similarly if my method name would’ve contained some parameters like taking some int, string, bool etc values and then base on it returning some value then I would’ve to add another key paramTypes in it and suppose if it were taking any boolean value like this:
.method public isVip(Z)Z // Here in parameter as we can see it's taking a boolean value (Z) and returning a boolean value (Z)
    .registers 4

    .prologue
    .line 43
    move-object v0, p0

    const/4 v2, 0x0

    move v0, v2

    return v0
.end method
then my hook would’ve looked like this:
{
  "com.mycompany.application.MainActivity": {
    // Here goes the class name
    "isVip": {
      // Here goes the method name
      "paramTypes": ["boolean"], // Here goes the parameter types
      "after": {
        // I wanna modify the return value of this method
        "result": true // My new return value
      }
    }
  }
}
If it were had integer:
.method public isVip(I)Z // Here in parameter as we can see it's taking a integer value (I) and returning a boolean value (Z)
    .registers 4

    .prologue
    .line 43
    move-object v0, p0

    const/4 v2, 0x0

    move v0, v2

    return v0
.end method
then my hook would’ve looked like this:
{
  "com.mycompany.application.MainActivity": {
    // Here goes the class name
    "isVip": {
      // Here goes the method name
      "paramTypes": ["int"], // Here goes the parameter types
      "after": {
        // I wanna modify the return value of this method
        "result": true // My new return value
      }
    }
  }
}
similarly you can add as many parameters as you want. here again if it had been taking boolean and a string:
.method public isVip(ILjava/lang/String;)Z // Here in parameter as we can see it's taking an integer value (I) and a string value (Ljava/lang/String;) and returning a boolean value (Z)
    .registers 4

    .prologue
    .line 43
    move-object v0, p0

    const/4 v2, 0x0

    move v0, v2

    return v0
.end method
then my hook would look like this:
{
  "com.mycompany.application.MainActivity": {
    // Here goes the class name
    "isVip": {
      // Here goes the method name
      "paramTypes": ["int", "java.lang.String"], // Here goes the parameter types
      "after": {
        // I wanna modify the return value of this method
        "result": true // My new return value
      }
    }
  }
}
Or if you want to modify the arguments of the method then you can use before key instead of after key.
for example just taking above note if method would be taking bool and string:
.method public isVip(ZLjava/lang/String;)Z // Here in parameter as we can see it's taking a boolean value (Z) and a string value (Ljava/lang/String;) and returning a boolean value (Z)
    .registers 4

    .prologue
    .line 43
    move-object v0, p0

    const/4 v2, 0x0

    move v0, v2

    return v0
.end method
then the config would look like this:
{
  "com.mycompany.application.MainActivity": {
    // Here goes the class name
    "isVip": {
      // Here goes the method name
      "paramTypes": ["boolean", "java.lang.String"], // Here goes the parameter types
      "before": {
        // I wanna modify the return value of this method
        "args": [
          true, // My new boolean value
          "My new string" // My new string value
        ]
      },
      // Now if you wanna modify the return value then you can use after key
      // if the return values are dependent on the arguments(i.e, they determine what would be result of the method) then you can ignore the after key as you've already modified the arguments
      "after": {
        // I also wanna modify the return value of this method
        "result": true // My new return value
      }
    }
  }
}
That’s it, check the readme and config file for more examples and details.
Step 5: Compile the apk
Now modify the AndroidManifest.xml file and add the provider tag in it.
<provider
    android:name="com.pinehook.plus.Loader"
    android:exported="false"
    android:authorities="com.pinehook.plus.loader"
    android:initOrder="100" />
Here’s how it looks like after adding the provider tag:
<?xml version="1.0" encoding="utf-8"?>
<manifest xmlns:android="http://schemas.android.com/apk/res/android"
    android:versionCode="1"
    android:versionName="1.0"
    android:compileSdkVersion="30"
    android:compileSdkVersionCodename="11"
    package="com.mycompany.application"
    platformBuildVersionCode="30"
    platformBuildVersionName="11">
    <uses-sdk
        android:minSdkVersion="21"
        android:targetSdkVersion="29" />
    <application
        android:theme="@style/AppTheme"
        android:label="@string/app_name"
        android:icon="@drawable/ic_launcher"
        android:name=".Applications"
        android:debuggable="true"
        android:allowBackup="true"
        android:largeHeap="true"
        android:resizeableActivity="true">
        <activity
            android:label="@string/app_name"
            android:name=".MainActivity">
            <intent-filter>
                <action
                    android:name="android.intent.action.MAIN" />
                <category
                    android:name="android.intent.category.LAUNCHER" />
            </intent-filter>
        </activity>
        <!-- Provider tag Start -->
        <provider
            android:name="com.pinehook.plus.Loader"
            android:exported="false"
            android:authorities="com.pinehook.plus.loader"
            android:initOrder="100" />
        <!-- End of the provider tag -->
        <activity
            android:name=".DebugActivity"
            android:screenOrientation="portrait" />
        <meta-data
            android:name="android.max_aspect"
            android:value="4.0" />
    </application>
</manifest>
Now compile the apk and install it.
Now, when you open the app, you’ll see the Subscribed message instead of Not Subscribed.
That’s it, you’ve successfully hooked the method.
Did you see that how easy it was to hook a method using PineHook+? If we remove the time taken in extracting the dex and moving the files, explaining things to you, then it was just like Identify target method -> Add hook files -> Modify the hook config & Manifest -> Compile the apk -> Install the apk -> Done!
Enjoy! 😊
Happy Hooking! 🎣